

Tools and tips
Having the right tools will help you achieve a neat result, so it is worth gathering everything you need in advance. You don’t necessarily need all the tools below and you can definitely improvise with whatever you have and works for you, but it will make your crafting experience easier, if you put some thought into what you may need.

Cutting
Use a good craft knife to cut along the solid outlines. Do not cut the dashed lines. The dashed lines represent folds (see below).
Use a metal ruler to guide the craft knife, unless you are confident doing it freehand. You can use a good pair of scissors for most parts, but a craft knife is more accurate.
Do not let young children handle tools that may cause injury.
Make sure you protect the surface you are cutting on. If you don’t have a cutting mat, use a thick piece of cardboard, old magazine or a chopping board.
Scoring
You will need a blunt tool to score all the fold lines. There is a variety of tools you can use. It doesn’t matter what you choose, as long as you achieve nice creases and the card folds easily. Scoring is meant to compress the paper fibres, not to half-cut the card. Here are some suggestions:
Bone folders: Thin, flat bone folders will also be useful for folding and pressing down gluing tabs in areas that your fingers may not reach easily.
The tip of a pair of scissors or a blunt knife: Turn them, so you are using the non-cutting edge.
The corner of a small plastic ruler.
An empty ballpark pen. This is very effective, but if the ink hasn't run out, it will obscure the type of fold line. Use different colors, if you don't have empty pens, so you can still tell which fold is which, after you score them.
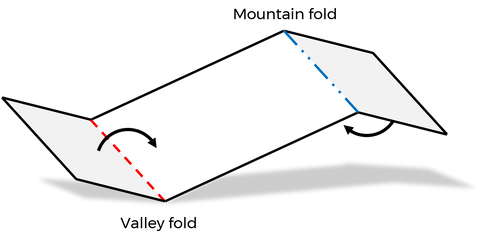
The dashed lines represent valley folds (in red) and the dashed with dots lines (in blue) represent mountain folds. You don’t need to turn over the card to score the fold lines with different orientation. Score all of them on the side of the pattern.
Folding
Fold all the scored lines well to create sharp folds. Run the side of a bone folder, ruler or pen over the folds to make them crisp. The sharper the folds, the better.
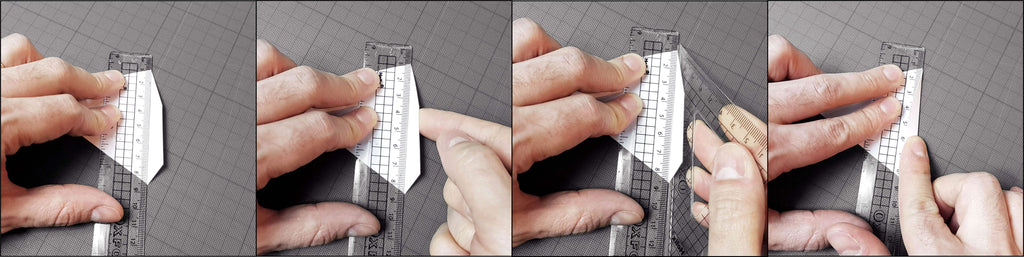
General tip for acute angles when folding
It is very important to score well converging fold lines and any tabs that have acute angles. A small (thin) plastic ruler is very useful for this. Place the ruler on the scored line and use a flat tool (or a second ruler) to lift and fold the flap against it, like in the following images.
Gluing
An extra strength glue stick is ideal and less messy. Makes sure you apply the glue all the way to the edges of the gluing tabs. If you use liquid glue, you will have to hold the pieces together a bit longer until it sets. You can also use double sided tape. Have some sticky tape handy in case you want to reinforce any of the seams from the inside or hold pieces together whilst the glue is drying.
Find the matching numbers and start connecting the pieces by sticking each tab to the edge with the same number. The tabs always go on the inside. Note that the sequence of numbers does not correspond to the order of gluing.
It is best to connect first all the matching numbers within each piece, before you start connecting the pieces. Start with piece #1 and connect the rest of the pieces around it. There is not only one correct way of doing this. Always test fit the pieces before you apply glue, to be certain where everything goes.
You will find that some gluing tabs may be wider than others or have irregular shape. This is done deliberately to make cutting and assembling easier. Some tabs may also overlap on the inside.
Adjusting your mask
The masks are designed to fit an average male adult head. If you are making a mask for someone with a smaller head, then glue some scrunched up paper as padding on the inside so the eye holes are at the right level or to stop the mask wobbling. You can do the same, if you want to adjust how far the mask sits from your face, by gluing small pieces of paper or foam on the inside.
Feel free to adjust the shape of eye holes, mouth openings or to add nostrils to full face masks, if you want to.
If you are having any difficulty, are unsure or want more tips and advice, please do not hesitate to give us a shout at info@ntanos.co.uk